手写防抖函数 debounce 和节流函数 throttle

手写防抖函数 debounce 和节流函数 throttle

本文参考:

基础理论

最近看到这么一道面试题:手写实现 debounce 和 throttle。

盗图,侵删

一脸懵逼,真的是。这两个英文单词都是什么鬼(原谅我英文词汇量太烂),后来看了下,原来是防抖和节流的意思啊。

那么,防抖和节流又是什么东西?

这两个东西,其实都是用来处理某个工作短时间内过于频繁触发的场景,只是根据不同的处理方式有不同的说法。

防抖:某个函数在短时间内只执行最后一次。

意思也就是说,函数被触发时,需要先延迟,在延迟的时间内,如果再次被触发,则取消之前的延迟,重新开始延迟。这样就能达到,只响应最后一次,其余的请求都过滤掉。

这种处理方式有很多实际的应用场景:比如对输入框数据的校验处理,没必要每输入一个字符就校验一遍;

节流:某个函数在指定时间段内只执行第一次,直到指定时间段结束,周而复始。

跟防抖不一样的是,节流是指定时间段内只执行第一次,也就是这段时间内,只需要响应第一次的请求即可,后续的请求都会被过滤掉,直到下个时间段,重新来过,周而复始。

应用场景:Android 里的屏幕刷新机制,每个帧(16.6ms)内,不管进行了多少次请求界面刷新的操作,只需响应第一次的请求,去向底层注册监听帧信号即可。因为接收到帧信号后,是通过遍历 View 树来刷新界面,所以注册的动作只需要进行一次就够了。Vue 的虚拟 DOM 的刷新也是类似的机制。

以上这些概念还不足以明白的话,再看张图(盗自开头链接中的文章):

盗用侵删

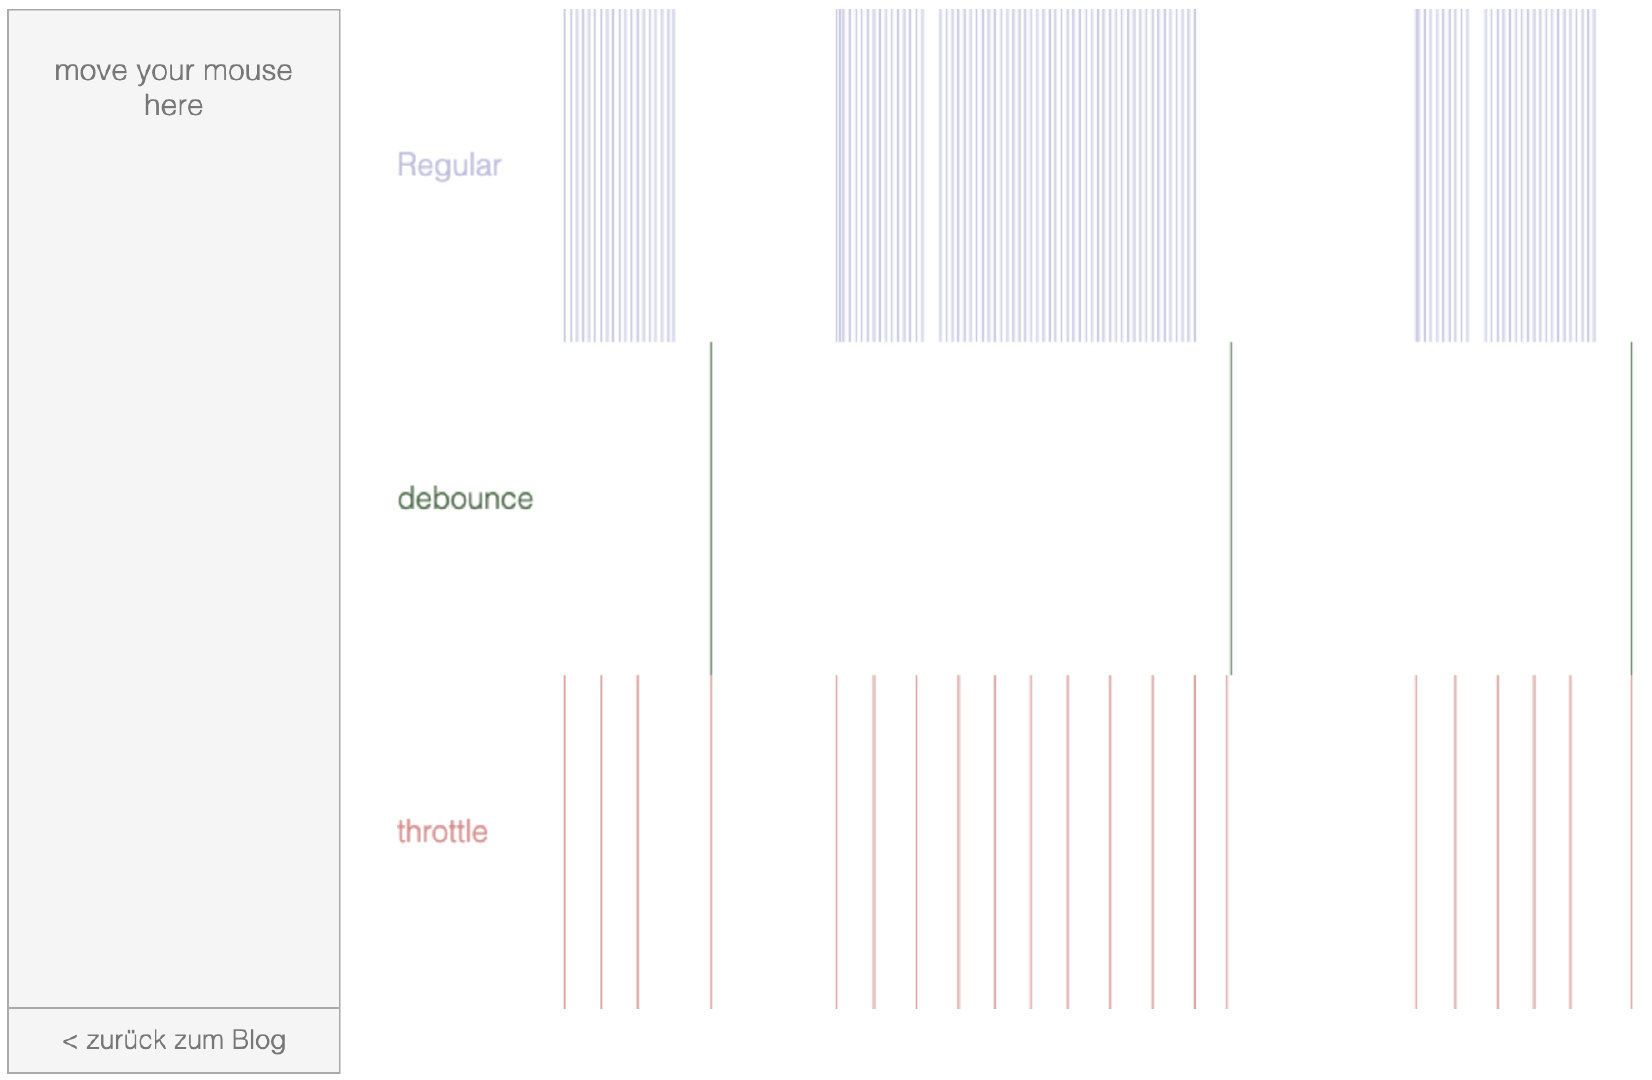
这样一来就理解了吧,第一行表示不做任何处理,频繁调用函数,每次都会响应;

经过 debounce 防抖处理后,只响应最后一次,因为防抖本质上就是通过延迟,所以实际执行函数时机会晚于函数的请求时机;

而经过 throttle 节流处理后,是按一定的频率来处理这堆频繁调用的函数,每个周期内,只响应第一次,过滤后面的请求,直到下个周期。

其实,或许你并没有接触到 debounce 防抖或 throttle 节流这种专业术语的说法,但实际开发中,你肯定或多或少有进行过类似防抖或节流的处理。下面讲讲它的实现,你就会发现,很似曾相识。

手写 throttle 节流函数

节流,顾名思义,就是节省流量。那么,为什么可以节流,自然就是这频繁被触发的工作,其实没必要次次响应。

我们上面举了个 Android 的屏幕刷新机制的例子,也就是在一个周期内,可以有无数次会触发屏幕刷新的操作,但其实只要第一次的操作去注册一下帧信号就可以了。

实现上,其实也很简单,就是加个标志位而已:

1
2
3
4
5
6
7
8
9
10
11
12
function throttle(fn, interval = 200) {
let flag = null;
return function(...args) {
if (!flag) {
flag = true;
setTimeout(() => {
flag = false;
fn.call(this, ...args);
}, interval);
}
}
}

是吧,就是简单的加个标志位来进行过滤。这里有个关键的点:fn.call(this, …args),为什么要通过 call 这种修改函数内部 this 的方式来调用原函数?直接 fn() 不行吗?

原因在手写 debounce 里分析吧,因为那里也是一样的处理。

那么,看到这个实现方案,有没有感觉有点熟悉,在项目中肯定会有所接触的,虽然由于这里的 throttle 函数是个通用的工具函数,而且是高阶函数,可能在项目中看到的不多。至少,我好像并没有在实际项目中使用过。

但这样的,你肯定经常写:

1
2
3
4
5
6
7
8
9
var flag = null;

function a() {
if (!flag) {
flag = true;
// do something
// 在某个回调里将 flag = false;
}
}

这种通过 flag 标志位过滤重复事件的处理,其实就跟节流的思想有点类似。区别只是,节流是通过一定的频率来修改标志位,来重新放行,而上面这种用法,则是依赖于某个任务完成后,再去回调修改标志位,也就是任务不完成,重复的事件都会被过滤。但两者的思想其实很类似。

手写 debounce 防抖函数

防抖处理我实际中用得比较多,所以打算讲讲,网上大众的实现,以及我针对具体项目的场景下的实现。

js 版

网上基本都是用的高阶函数实现,即封装一个工具函数 debounce,它以参数形式接收原函数,并返回一个经过防抖处理的新函数,后续涉及到需要防抖处理的,都需要使用新函数来替代原函数。

1
2
3
4
5
6
7
8
9
10
11
12
13
14
15
16
function debounce(fn, delay = 200) {
if (typeof fn !== 'function') { // 参数类型为函数
throw new TypeError('fn is not a function');
}

let lastFn = null;
return function(...args) {
if (lastFn) {
clearTimeout(lastFn);
}
let lastFn = setTimeout(() => {
lastFn = null;
fn.call(this, ...args);
}, delay);
}
}

其实很简单,就是每次调用函数前,先移除上次还处于延迟中的任务,然后重新发起一次新的延迟等待。

上面最重要的地方在于 fn.call(this, …args),这里之所以要通过 call 方式来修改原函数的 this,是因为,原函数通过参数进行传递时,是只会被当做普通函数处理,不管原函数本来是否挂载在某个对象上。

所以,如果 debounce 内部直接以 fn() 方式调用原函数,会导致原函数的内部 this 指向发生变化。

有两种解决方式:

一是:debounce 以 fn() 方式调用,但在使用 debounce 的地方,传递 fn 原函数时需要先进行绑定,如:

1
2
3
4
5
6
7
var o = {
c: 1,
a: function() {
console.log(this.c);
}
}
var b = debounce(o.a.bind(o));

这是一种方式,缺点是需要使用者手动进行显示绑定 this。

另一种方式:debounce 内部通过 apply 或 call 方式来调用原函数。

但这种方式也有一个前提,就是 debounce 返回的新函数需要把它当做原函数,和原函数一样的处理。如果原函数本来挂载在某对象上,新生成的函数也需要挂载到那对象上,因为 debounce 内部的 fn.call(this) 时,这个 this 是指返回的新函数调用时的 this。所以,需要让新函数的 this 和原函数是一致的,才会是期望的正常行为。

1
2
3
4
5
6
7
8
var o = {
c: 1,
a: function() {
console.log(this.c);
}
}

o.b = debounce(o.a);

总之,debounce 的用途就是通用的工具函数,所以需要防抖处理的工作,都可以通过 debounce 进行包装转换。

就算你没写过这个通用的工具函数,至少在项目中,也写过直接定义一个全局变量来进行防抖处理吧,类似这样:

1
2
3
4
5
6
7
8
9
10
11
var flag = null;

function task() {
if (flag) {
clearTimeout(flag);
}
flag = setTimeout(() => {
flag = null;
// do something
}, 200);
}

这其实也是防抖的处理,只是实现方式是直接对需要进行防抖处理的函数,在其代码基础上,直接进行改动。不具有通用性。

所以我才说,网上大众版的 debounce 防抖函数,也许你没接触过,也没见过,但不代表你没接触到防抖处理的思想,在实际项目中,其实或多或少都会有所接触了,只是实现的方式、通用性等不一样而已。

当然,以上的 js 版实现,只是一种最基础的方案,文章开头给出的链接中,还有很多扩展的实现,比如增加了支持第一次触发立即执行的功能;和 throttle 节流结合用法;手动取消延迟的功能等等。

感兴趣的可以自行查阅,我是觉得,大概知道基础思想就够了,实际项目中再根据需要去进行扩展。

ts + angular 版

我还想讲讲我在实际项目中所进行的防抖处理,上面的 js 版在每篇防抖文章中,基本都是那样实现,都是封装一个高阶函数。

但我实际开发中,使用的是 TypeScript,这是一种类似于 Java 思想的强类型语言,所以很少会用到高阶函数的思想,更多的是封装工具类。

再加上,我框架是使用 angular,项目中除了有防抖处理的场景,还有其他诸如延迟任务的场景,轮询任务的场景等等。这些不管是从用法、实现上等来说,都很相似,所以我都统一封装在一起。

另外,涉及 setTimeout,setInterval 这两个 API,如果没有进行清理工作,很容易造成内存泄漏,因此跟 setTimeout 和 setInterval 相关的用法,我都将它跟 angular 的组件进行绑定处理,避免开发人员忘记清理,至少我还可以在组件销毁时去自动清理。

1
2
3
4
5
6
7
8
9
10
11
12
13
14
15
16
17
18
19
20
21
22
23
24
25
26
27
28
29
30
31
32
33
34
35
36
37
38
39
40
41
42
43
44
45
46
47
48
49
50
51
52
53
54
55
56
57
58
59
60
61
62
63
64
65
66
67
68
69
70
71
72
73
74
75
76
77
78
79
80
81
82
83
84
85
86
87
88
89
90
91
92
93
94
95
96
97
98
99
100
101
102
103
104
105
106
107
export class PollingTaskUtils {
constructor(){}

static tag(component: {ngOnDestroy}, tag: string = 'default'): PollingMgr {
let taskTag = `__${tag}__`;
if (component[taskTag] == null) {
let pollingMgr = new PollingMgr(component, taskTag);
component[taskTag] = pollingMgr;
}
return component[taskTag];
}
}

export class PollingMgr {
private readonly AUTO_CLEAR_FLAG_PREFIX = '__auto_clear_flat';

private _delay: number = 0; // 任务的延迟时长
private _isLoop: boolean = false; // 是否是循环任务
private _interval: number; // 循环任务的间隔
private _resolve: {loop: (interval?: number) => any}
private _pollingTask: (resolve?: {loop: (interval?: number) => any}) => any;
private _pollingFlag = null;
private _pollingIntervalFlag = null;

constructor(protected component: {ngOnDestroy}, protected tag: string) {
this._resolve = {
loop: (interval?: number) => {
if (interval > 0) {
this._isLoop = true;
this._interval = interval;
} else {
this._isLoop = false;
}
this._handleLoop();
}
};
}

run(task: (resolve?: {loop: (interval?: number) => any}) => any) {
this._clear(this.component);
this._pollingTask = task;
if (this._delay) {
this._pollingFlag = setTimeout(() => {
this._pollingFlag = null;
task.apply(this.component, [this._resolve]);
}, this._delay);
} else {
task.apply(this.component, [this._resolve]);
}
this._handleAutoClear();
}

clear(component?: {ngOnDestroy}) {
this._clear(component);
}

delay(dealy: number): PollingMgr {
this._delay = delay;
return this;
}

runInterval(task: () => any, interval: number) {
if (!this._pollingIntervalFlag) {
this._pollingIntervalFlag = setInterval(() => {
task.apply(this.component);
}, interval);
}
this._handleAutoClear();
return this._pollingIntervalFlag;
}

private _handleLoop() {
if (this._isLoop) {
this._clear(this.component);
this._pollingFlag = setTimeout(() => {
this._pollingFlag = null;
this._pollingTask.apply(this.component, [this._resolve]);
}, this._interval);
}
}

private _handleAutoClear() {
if (this.component[this.AUTO_CLEAR_FLAG_PREFIX + this.tag] == null) {
this.component[this.AUTO_CLEAR_FLAG_PREFIX + this.tag] = true;
let originFun = this.component['ngOnDestroy'];
this.component['ngOnDestroy'] = (): void => {
originFun.apply(this.component);
delete this.component[this.tag];
delete this.component[this.AUTO_CLEAR_FLAG_PREFIX + this.tag];
this._pollingTask = null;
this._clear(this.component);
if (this._pollingIntervalFlag) {
clearInterval(this._pollingIntervalFlag);
this._pollingIntervalFlag = null;
}
};
}
}

private _clear(component: {ngOnDestroy}) {
this._isLoop = false;
if (this._pollingFlag) {
clearTimeout(this._pollingFlag);
this._pollingFlag = null;
}
}
}

当初封装的时候没有写注释,感兴趣的再细看吧,这里就是做个记录,方便后续查阅,下面看看用法:

1
2
3
4
5
6
7
8
9
10
11
12
13
14
15
16
17
18
19
20
21
22
23
24
25
26
27
28
29
30
31
32
33
34
35
36
37
38
39
40
41
42
43
44
45
46
47
48
49
50
51
52
53
54
/**
* 轮询、延迟、防抖的任务工具类
* 入口接收两个参数:
* component:当前的组件类,使用时必须挂载在某个组件上,在组件销户时,如果有轮询任务,会去进行释放定时器
* tag:可选参数,用于标识不同的任务,相同的 tag,多次调用都会被视为同个任务进行防抖处理
*/
PollingTaskUtils.tag(component, tag?: string);

// 1. 延迟任务用法,比如延迟5s后处理
PollingTaskUtils.tag(this).delay(5000).run(() => {
// do something
});
// 因为 tag 没传,该任务会和上面的被视为同个任务,如果上个任务延迟未被执行,则先取消,以下面为主
PollingTaskUtils.tag(this).delay(5000).run(() => {
// do something
});
// tag 参数指定为 'task',表示一个新的任务,会上述的延迟任务相互独立
PollingTaskUtils.tag(this).delay(5000, 'task').run(() => {
// do something
});

// 2. 轮询任务,比如每隔 10s 发起一次请求
PollingTaskUtils.tag(this).run(resolve => {
// 模拟请求
setTimeout(() => {
// do something
resolve.loop(10000); // 设置轮询间隔
}, 2000)
});

// 3. 轮询任务,符合一定条件停止轮询
PollingTaskUtils.tag(this).run(resolve => {
// 模拟请求
setTimeout(() => {
if (flag) {
resolve.loop(-1); // <=0 或者不调用时停止轮询
} else {
resolve.loop(3000);
}
}, 2000);
});

// 4. 防抖处理
let i = 0;
while(i++ < 10) {
PollingTaskUtils.tag(this).delay(500).run(() => {
// do something
});
}

// 5. 由于 run 内部是通过 setTimeout 来实现轮询任务,但这个并不精准,当要求较精准的轮询时,比如时钟,使用 setInterval 会比较精准
PollingTaskUtils.tag(this).runInterval(() => {
// do something
}, 1000);

其实用法跟直接用 setTimeout 和 setInterval 没多大区别,但好处在于,增加了跟组件的绑定,增加了对任务标识的处理,这样一来,即使忘记清理,内部也可以在组件销毁时自动去清理,即使多次调用,只要任务标识不一样,内部就会进行防抖处理。可以省掉一部分的工作量。

当然,这些所有的出发点,仅适用于我的项目,因为毕竟是从项目中遇到的需求中来进行封装处理的,并不一定适用于你。

我想说的是,这些工具函数的封装,重要的是掌握其思想,为什么需要进行防抖处理?防抖处理的基本实现是什么?知道这些即可,其余的,再自行根据需要扩展学习。

请叫我大苏 wechat
您的支持将鼓励我继续创作!